
Windows 10에서 WSL을 이용하여 Linux 배포판을 설치 할 수 있습니다. 윈도우에서 Linux를 사용한다는 것은 상당히 매력적입니다.
또한 Windows New Terminal을 이용하면 여러가지 Terminal(Dos, PowerShell, Ubuntu...)을 하나로 관리 할 수 있습니다.
먼저 WSL의 설치부터 알아보겠습니다.
WSL 설치
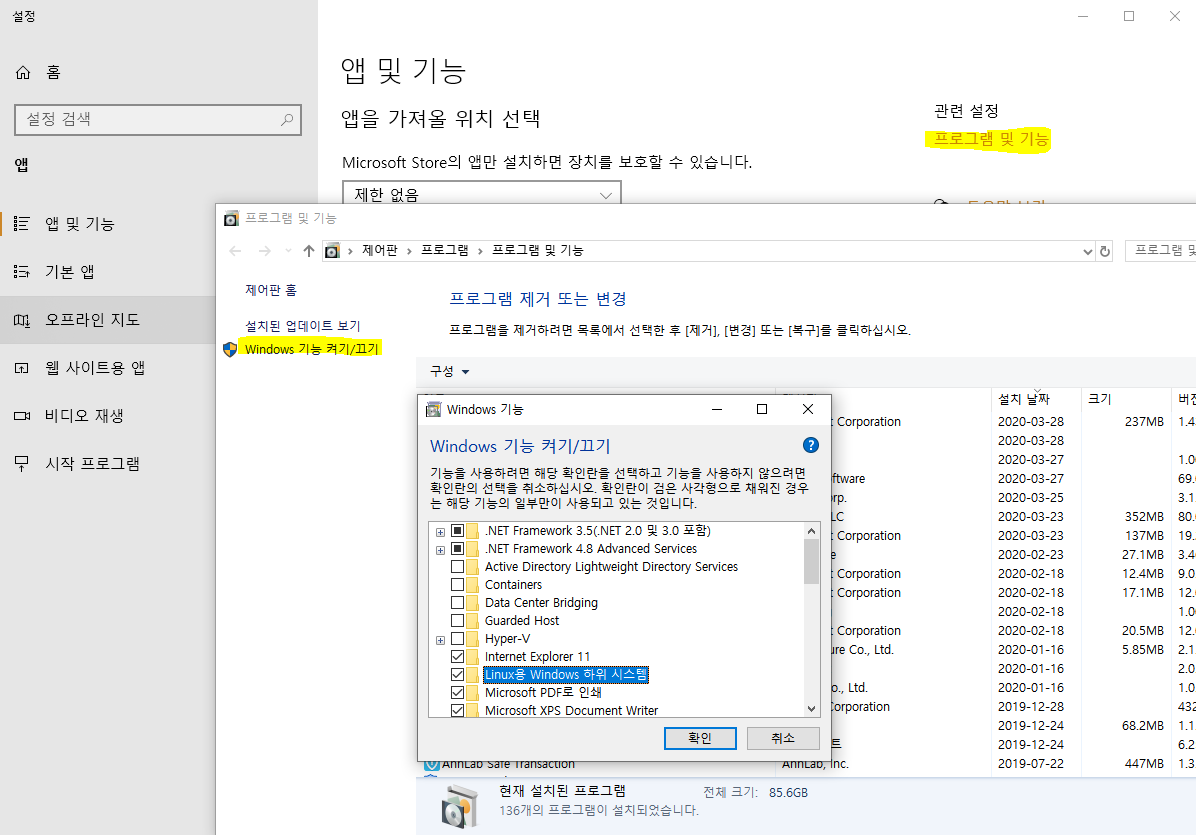
[Win+Q]를 눌러 검색창에 "앱 및 기능"을 입력하여 아래 창을 엽니다.
오른쪽 상단에 [프로그램 및 기능]을 눌러 [Windows 기능 켜기/끄기]를 누릅니다.
[Linux용 Windows 하위 시스템]을 체크합니다.
설치가 완료되면 Microsoft Store에서 Linux 배포판을 설치합니다.
검색에서 wsl로 검색하면 설치할 수 있는 배포만이 나타납니다.
이중에서 Ubuntu 18.04 LTS를 설치하겠습니다. (화면에 보이지 않는다면 "모두 표시"를 눌러 보세요)

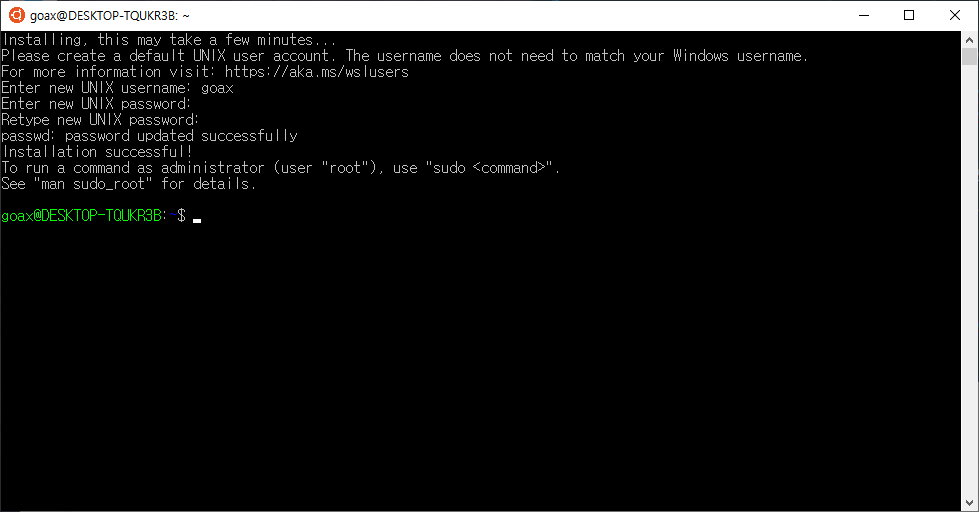
설치 후 [실행] 버튼을 눌러 설정을 마무리 해야합니다.

아래와 같이 Username, Password를 지정해야 합니다.
위의 Shell은 종료하고 Windows New Terminal을 설치합니다.
Windows New Terminal
Microsoft Store에서 Terminal로 검색하여 설치합니다.

설치에는 여러 방법이 있지만 공식적으로 Microsoft Store를 이용하기를 권장합니다.
터미널을 실행하면 처음에 PowerShell이 실행됩니다.

몇가지 설정을 변경하겠습니다.
- 기본 Shell을 Ubuntu로 변경
- 테마 변경
- 폰트 변경
- 창 크기 및 시작 위치
- 단축키 변경
위 그림의 Settings 메뉴를 눌러 JSON을 변경합니다.
(아래 JSON을 참고하여 본인의 환경에 맞게 편집해야 합니다.)
// To view the default settings, hold "alt" while clicking on the "Settings" button.
// For documentation on these settings, see: https://aka.ms/terminal-documentation

{
    "$schema": "https://aka.ms/terminal-profiles-schema",

    "defaultProfile": "{c6eaf9f4-32a7-5fdc-b5cf-066e8a4b1e40}", // 아래 list에서 선택
    "initialPosition": "0, 0",   // 시작 위치
    "initialRows": 79,   // 화면에 보이는 줄 수
    "initialCols": 120,  // 화면에 보이는 글자 수
    "theme": "dark",  // System과 상관없이 Dark 테마 사용

    "profiles":
    {
        "defaults":
        {
            // Put settings here that you want to apply to all profiles
        },
        "list":
        [
            {
                // Make changes here to the powershell.exe profile
                "guid": "{61c54bbd-c2c6-5271-96e7-009a87ff44bf}",
                "name": "Windows PowerShell",
                "commandline": "powershell.exe",
                "hidden": false
            },
            {
                // Make changes here to the cmd.exe profile
                "guid": "{0caa0dad-35be-5f56-a8ff-afceeeaa6101}",
                "name": "cmd",
                "commandline": "cmd.exe",
                "hidden": false
            },
            {
                "guid": "{b453ae62-4e3d-5e58-b989-0a998ec441b8}",
                "hidden": false,
                "name": "Azure Cloud Shell",
                "source": "Windows.Terminal.Azure"
            },
            {
                "guid": "{c6eaf9f4-32a7-5fdc-b5cf-066e8a4b1e40}",
                "hidden": false,
                "name": "Ubuntu-18.04",
                "source": "Windows.Terminal.Wsl",
                "colorScheme": "One Half Dark",
                "fontFace": "Meslo LG S for Powerline",
                "fontSize": 10
            }
        ]
    },

    // Add custom color schemes to this array
    "schemes": [],

    // Add any keybinding overrides to this array.
    // To unbind a default keybinding, set the command to "unbound"
    "keybindings": [
        {
            "command": "newTab",
            "keys": ["ctrl+t"]
        },
        {
            "command": "closeTab",
            "keys": ["ctrl+w"]
        }
    ]
}
ColorScheme는 Default JSON에 몇개 정의되어 있습니다.
- Campbell
- Campbell Powershell
- Vintage
- One Half Dark
- One Half Light
- Solarized Dark
- Solarized Light
Customize하기 위해서는 schemes에 배열로 추가합니다.
One Half Dark를 사용하므로 추가는 하지 않겠습니다.
zsh의 agnoster 테마를 사용하기 위해 Meslo 폰트(클릭)를 다운받아 C:\Windows\Fonts에 설치하고 "Meslo LG S for Powerline" 폰트를 설정합니다.

위의 상태에서 zsh를 설치하겠습니다.
Oh My Zsh
zsh를 apt-get으로 설치를 한 후 onmyzsh를 설치하겠습니다.
$ sudo apt-get update
$ sudo apt-get install zsh
$ sh -c "$(curl -fsSL https://raw.githubusercontent.com/ohmyzsh/ohmyzsh/master/tools/install.sh)"
설치 후에 테마를 agnoster로 변경하면 아래 처럼 보기 좋게 변경됩니다.
vi ~/.zshrc
7 # Set name of the theme to load --- if set to "random", it will
8 # load a random theme each time oh-my-zsh is loaded, in which case,
9 # to know which specific one was loaded, run: echo $RANDOM_THEME
10 # See https://github.com/ohmyzsh/ohmyzsh/wiki/Themes
11 ZSH_THEME="agnoster"
. ~/.zshrc

기존 포스트에서 Plugin을 macOS에 설치하는 방법을 설명하였습니다.
Ubuntu에서는 변경되는 부분이 있으므로 다시 한번 작성하겠습니다.
Plugins
Autojump
apt-get 으로 autojump를 설치합니다.
$ sudo apt-get update
$ sudo apt-get install autojump
설치후에 .zshrc의 plugins에 autojump를 추가합니다.
66 # Which plugins would you like to load?
67 # Standard plugins can be found in ~/.oh-my-zsh/plugins/*
68 # Custom plugins may be added to ~/.oh-my-zsh/custom/plugins/
69 # Example format: plugins=(rails git textmate ruby lighthouse)
70 # Add wisely, as too many plugins slow down shell startup.
71 plugins=(git autojump)
.zshrc를 Sourcing 합니다.
. ~/.zshrc
autojump는 jump하기 전에 반드시 한번은 cd로 탐색해야만 합니다.
여러 디렉토리를 cd로 돌아다닌 후, autojump -s로 방문한 디렉토리의 기록을 볼 수 있습니다.
사용법
- foo를 포함하는 디렉토리로 점프
- j foo
- 현재 디렉토리의 자식 디렉토리로 점프
- jc bar
- WSL에서는 작동 안함
Jump하지 않고 해당 디렉토리를 File Manager로 실행 (Mac Finder, Windows Explorer, GNOME Nautilus, etc.)jo foojco bar

Auto Suggestions
터미널 입력시 History 기반 단어(?)를 추천해줍니다.
git clone 방식으로 설치합니다.
it clone https://github.com/zsh-users/zsh-autosuggestions ${ZSH_CUSTOM:-~/.oh-my-zsh/custom}/plugins/zsh-autosuggestions
.zshrc의 plugins에 추가합니다.
66 # Which plugins would you like to load?
67 # Standard plugins can be found in ~/.oh-my-zsh/plugins/*
68 # Custom plugins may be added to ~/.oh-my-zsh/custom/plugins/
69 # Example format: plugins=(rails git textmate ruby lighthouse)
70 # Add wisely, as too many plugins slow down shell startup.
71 plugins=(git autojump zsh-autosuggestions)
.zshrc를 Sourcing하면 다음과 같이 Auto Suggestion이 작동합니다.
. ~/.zshrc

Syntax Highlighting
zsh에서 해당 Command가 실행될 수 있는지 또는 에러인지 확인할 수 있습니다.
zsh-syntax-highlighting 플러그인을 설치해보겠습니다.
git clone 방식으로 설치하겠습니다.
git clone https://github.com/zsh-users/zsh-syntax-highlighting.git ${ZSH_CUSTOM:-~/.oh-my-zsh/custom}/plugins/zsh-syntax-highlighting
Clone이 성공하면 해당 디렉토리에 파일이 생성됩니다.
$ ll ~/.oh-my-zsh/custom/plugins
total 0
drwxr-xr-x   3 goax  staff    96B Feb 27 20:19 example
drwxr-xr-x  22 goax  staff   704B Feb 28 00:41 zsh-syntax-highlighting
아래 Command로 .zshrc의 마지막에 zsh-syntax-highlighting.zsh를 추가합니다.
echo "source ~/.oh-my-zsh/custom/plugins/zsh-syntax-highlighting/zsh-syntax-highlighting.zsh" >> ${HOME}/.zshrc
.zshrc를 sourcing하면 아래와 같은 메시지가 보여집니다.

mac에서 다계정인 경우 zsh를 설치할 때 발생하던 문제로 Permission 관련 이슈입니다.
ZSH_DISABLE_COMPFIX=true로 Verification을 Skip합니다.
마지막 문장이 중요한데, 반드시 .zshrc의 oh-my-zsh를 source하기 전에 해야 합니다.
라인 번호는 다를 수 있으니 검색을 이용해서 적당한 라인에 해당 값을 입력합니다.
vi ~/.zshrc
66 # Which plugins would you like to load?
67 # Standard plugins can be found in ~/.oh-my-zsh/plugins/*
68 # Custom plugins may be added to ~/.oh-my-zsh/custom/plugins/
69 # Example format: plugins=(rails git textmate ruby lighthouse)
70 # Add wisely, as too many plugins slow down shell startup.
71 plugins=(git autojump zsh-syntax-highlighting)
72
73 ZSH_DISABLE_COMPFIX="true"
74
75 source $ZSH/oh-my-zsh.sh
.zshrc를 Sourcing하여 적용합니다.
. ~/.zshrc더이상 불평하는 메시지가 뜨지 않습니다.
